


Bacteria often grow in groups to better their chance of survival and spread their species more efficiently. A biofilm is a great example of this phenomenon.
Age Appropriateness
10-12 years old
INTRODUCTION
Bacteria often grow in groups to better their chance of survival and spread their species more efficiently. A biofilm is a great example of this phenomenon. You probably have seen or felt biofilms in many places. Rocks in a stream are usually very slippery due to a biofilm on the surface. If it's been a while since you brushed your teeth, you can feel a thin coating on your teeth with your tongue or finger called plaque. The plaque you are feeling is another example of a biofilm.
Biofilms are groups of bacterial colonies surrounded by a gooey substance secreted by the bacteria. The gooey, slimy substance is called a polysaccharide (pronounced polly-sack-uh-ride) . Once formed, a biofilm is more difficult to remove than a standalone bacteria cell because typical removal agents can only kill the bacteria at the surface and cannot reach the lower layers of a biofilm. Biofilms that form on rocks are harmless, however biofilms that develop in pipes often contribute to deterioration of the metal. Bacteria cells within a biofilm communicate chemically, sharing nutrients and enzymes that are resistant to antibiotics or other competitive species. Within the biofilm matrix there are channels that move water and waste. Cells located deep from the surface often have a slower metabolism. Metabolism is the sum of chemical processes occurring within a living cell or organism that are necessary for life. The significance of cells with a slow metabolism is that they will survive antibiotic treatments because antibiotic medications such as penicillin act only on active, growing cells; thus making it more difficult to remove. This is a concern in the medical community and since alternative treatments are always as effective.
In this experiment, you will grow your own biofilms! You will also decide which substances facilitate or hinder biofilm growth. While you're performing this experiment, think what other problems biofilms may cause and cases where they could be beneficial.
In the activity, we will:
- Determine by experimentation what surfaces have the best habitat for biofilms.
- Figure out what we can do to prevent biofilm formations.
Materials
- tall bucket, such as a 5 gal. bucket (about 40 cm tall)
- artificial pond (see instructions below)
- stick or dowel longer than bucket is wide
- clear, empty 2-liter soda bottle (remove label)
- scissors
- hole puncher
- 2 medium-size washers, fishing weights or small stones
- 2 pieces of string, each 1 meter long
- small, shallow dishpan or small bucket
- magnifying glass
- coating materials: i.e. Vaseline, hot pepper sauce/ketchup, nail polish, suntan lotion, antibacterial cream
- newspaper or disposable table cover
Safety
- All steps in procedure should be done under adult supervision.
- Be sure to wash your hands before and after the procedure.
- Do not eat anything from this experiment.
- Be careful when collecting water if it is near a body of water.
- Scissors and the plastic that has been cut may have sharp edges; use caution when handling.
- Dispose of all biofilms grown in experiment and wash hands immediately.
 Activity
- If you have a nearby body of water, fill the large bucket with water and about two cups of mud from the local stream or pond. If a body of water is not available, fill up the bucket 3/4 full with tap water and then add 2 cups of dirt or mud to it. Let the bucket sit for 24 hours.
- Cut the top and bottom of the 2 liter bottle off a couple inches from each end. Cut the remaining cylinder down the middle (long ways) to make a flat piece of plastic.
- Divide up the plastic into rectangles with the scissors. Cut out as many rectangles as you have substances to test.
- With the hole puncher, punch a hole in each side of the plastic strips (about 1 cm from the edge).
- Lay newspaper or other disposable covering out on a table and cover both sides of each strip with a different substance and allow ample time to dry, usually a day or two.
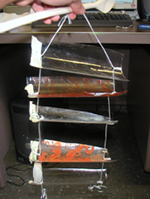
- Place the strips in a row. Take a long (1 meter in length) piece of rope and tie a knot at the end and add the weight to the end. Tie another knot about 8 cm above the weight and place the string through the strip. Tie the strips about 3 cm apart on one side of the string.
- Make sure you write down the order of the strips so you know which substance each strip has on it and do NOT lose it!
- Get another 1 m long piece and repeat on the other side. Tie the two ropes together so your rope looks like the picture.
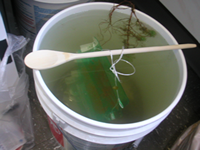 Hang the setup from a stick or dowel rod over the bucket, making sure all strips are submerged, but not touching the bottom/sides. Let it sit for 2 weeks undisturbed. Make sure you check back on to see if the water level has dropped below the top strip; add more water as needed.
- Add some of the "pond" water from the large bucket to a shallow pan without bumping and disturbing the pond.
- Take out the strips carefully by pulling up on your dowel rod without touching the surface because you may smudge off your biofilm otherwise and set them down into the shallow pan.
- Examine the strips with a magnifying glass. Using the uncoated strip as a benchmark, rank the other strips using a 1-5 scoring system. 1 being the least amount of growth, 3 being the uncoated (control) strip, and 5 as the most growth. Make a table if you would like to record the data like the one below.
|
Substance (in order from top to bottom/washers ) |
Score |
|
Control |
3 |
|
Vasiline |
4 |
|
Hot pepper sauce |
5 |
|
Nail polish |
4 |
|
Suntan lotion |
4 |
Summary
Biofilms cause problems in industry by contaminating supplies, causing equipment to fail, and increasing the rate of erosion. Removing them is often difficult because of the defenses they have build up mentioned earlier. Benefits of biofilms include decreasing toxic elements because of the biofilms natural resistance to toxins.
Resources
http://medmyst.rice.edu/html/lessons/MM-TM2-33.pdf
http://www.learner.org/channel/courses/biology/textbook/microb/microb_9
http://www.microbe.org/experiment/biofilms.asp
http://www.personal.psu.edu/faculty/j/e/jel5/biofilms/primer.html
Activity PDF: biofilm.pdf