Microcapsules are all around us. One application you have probably seen is a scratch-and-sniff sticker. The active ingredient in these microcapsules is scented liquid.
Microcapsules are all around us. One application you have probably seen is a scratch-and-sniff sticker. The active ingredient in these microcapsules is scented liquid. You want to keep the smells trapped until you are ready to smell them. This makes the stickers stay smelly longer! When you want to release the smells, scratching ruptures the outer layer of some of the microcapsules.
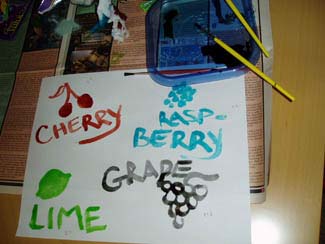
Drink mixes have very strong fruity tastes and smells, and can be used to make scratch-and-sniff paints. Because the solution of the drink mix we will use is very concentrated, the other ingredients will dry to create a layer that can trap the smells.
To learn more about how we smell, see the Making Scented Inserts activity.
In this activity we will:
Make your own scratch-and-sniff stickers
*Younger ages may prefer making scratch-and-sniff paintings (see alternative at the end of activity)
Materials needed
- Labels: large, blank with adhesive backs
- Drink Mix: flavored & unsweetened - several packets, different & bright colors
- Paintbrush(es): one per color is nice, but not necessary
- Measuring spoons (1/8 teaspoon)
- Crayons
- Styrofoam Egg carton or other paint container
- Paper towels
- Newspaper or scrap paper
Activity
Tip: Name brand mix may be better because they contain more colorful dyes. Only a small amount is used from each packet, ~1/8 teaspoon each color gives enough for several stickers. Also, simple flavors (cherry, grape, lime, lemon, etc.) are preferred because it is easier to recognize the different smells.
Place the paint container (plastic egg tray) on top of a sheet of newspaper. For each color, mix ~1/8 teaspoon of drink mix with 1/8 teaspoon water (to get a 1:1 mixture). Stir with a paintbrush until uniform. You may need to add a little more water or more drink mix to get a smooth (but not thin) mix. It is best to use a different paintbrush for each color so you do not mix flavors (smells)! (If you only have 1 paintbrush, use the plastic end to mix paint and then wipe it clean for each color.)
After you are done mixing all your colors, you are ready to make your stickers. Get a label with the backing still on. Draw an outline of the picture or design you want with crayons. Press down when you draw to make thick dark marks. When you paint over this, the crayon will show up because the paint and wax from the crayon do not mix!
Now it’s time to paint! It is best to use a different paintbrush for each color so you do not mix flavors (smells)! Once you are done painting, leave your artwork to dry overnight. To speed up the process, you can use a paper towel to blot the wet spots – just be careful not to mix colors. When your stickers are completely dry (the next day), cut them out with scissors. Now you are ready to scratch-and-sniff!
Paint the Stickers
Next Day: Cut Out Dried Stickers
*Alternative: Thi s acti vity can be modified to make it more suitable for younger children. By painting on a blank sheet of paper instead of a label, children can make scratch-and-sniff pictures to hang on the wall or refrigerator. When using this modification, step 2 can be skipped, producing paintings that look more like watercolor paintings.
Activity PDF: scratch_sniff_stickers.pdf

